
Here is a small sampling of the projects we have worked on. Included is a before and after of each space so you can envision what your home could look like. If you would like to see any additional images, just ask!
LAUNDRY ROOMS
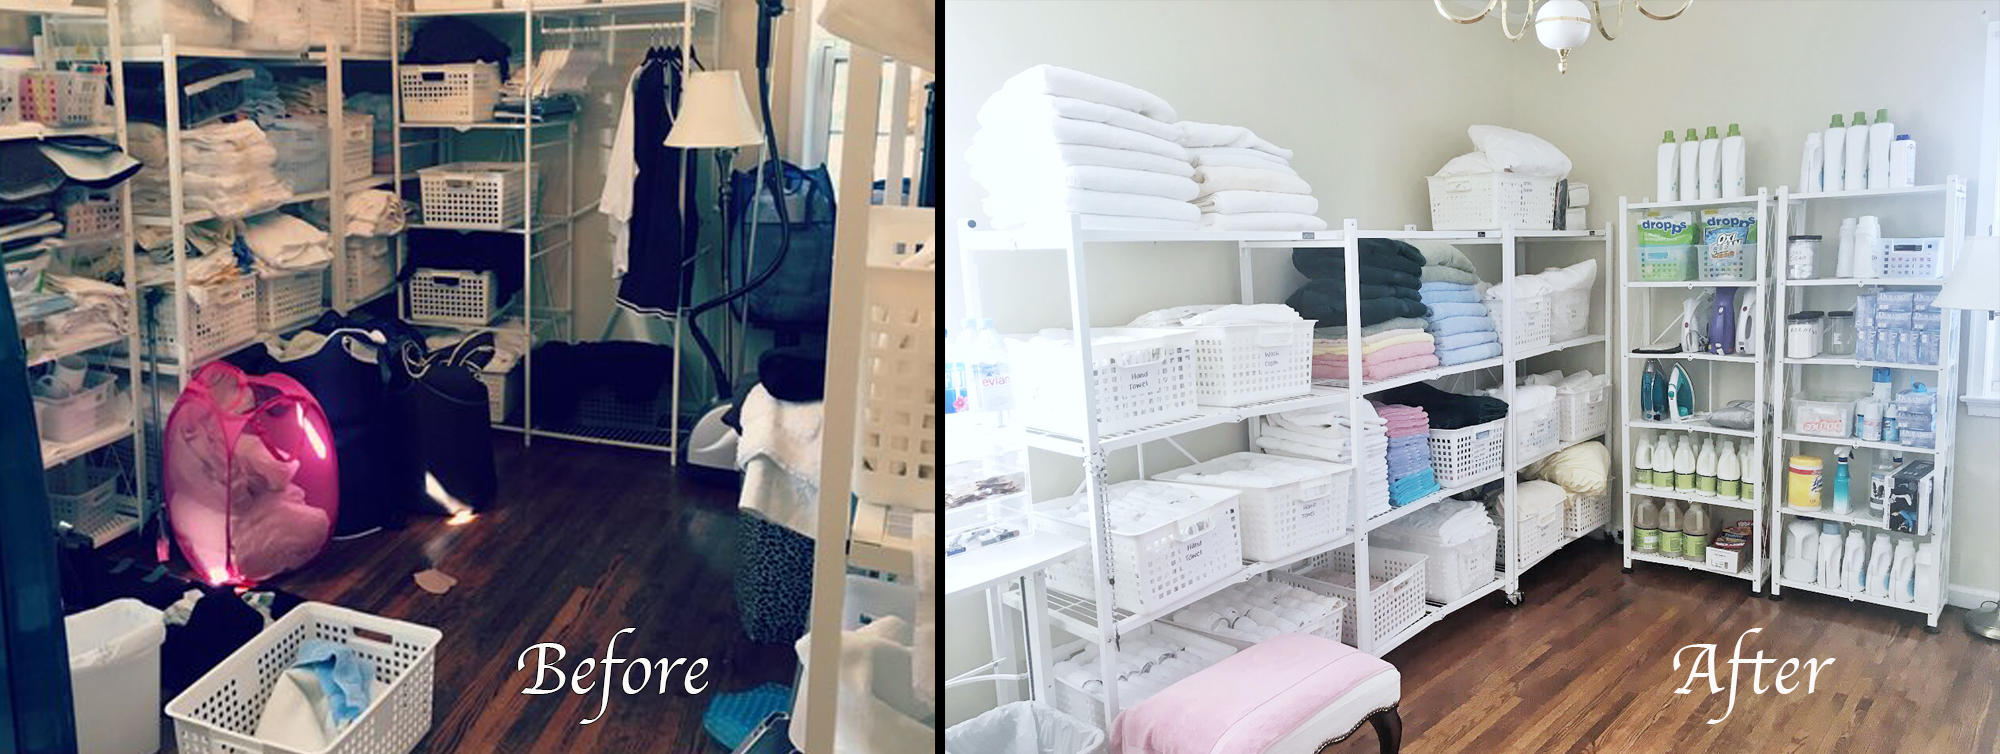
Laundry room organization
This laundry room needed to become a Klutter Free Zone. The towels were mixed in with sheets and all of the laundry supplies were, simply put: a big mess. We went in, emptied all of the shelves, and separated everything into proper groups. We then created well-defined labeled areas with bins to easily keep this area organized by the client. This laundry room went from chaotic to Klutter Free. Let us show you how!
BEDROOMS

BEDROOM WALK-IN CLOSET ORGANIZATION
This closet overhaul was so much fun! We went through a variety of clothing items with our client and sorted them into keep/throwaway/donate piles, which freed up some extra space. We then moved a shelf around in order to create a nice area for our client's sandals and flip flops, hung her clothing on matching hangers, separated her shoes by type, hung up her belts, and were left with a beautiful, organized walk-in closet of her dreams!

BEDROOM WALK-iN CLOSET ORGANIZATION
This walk-in closet was in need of some TLC. There was no real system in place for where specific items of clothing would go, and it lacked usable storage to create better systems. We implemented a shoe rack to store all of our client's shoes, installed a pole to hang dresses from, implemented matching hangers for a cohesive and neat look, categorized all like-clothing items together, and even set up a file folder system to hold our client's bags upright on the far left of the "After" photo (it is cut out of the image)! We're so happy we could help create this newly organized space for our clients!
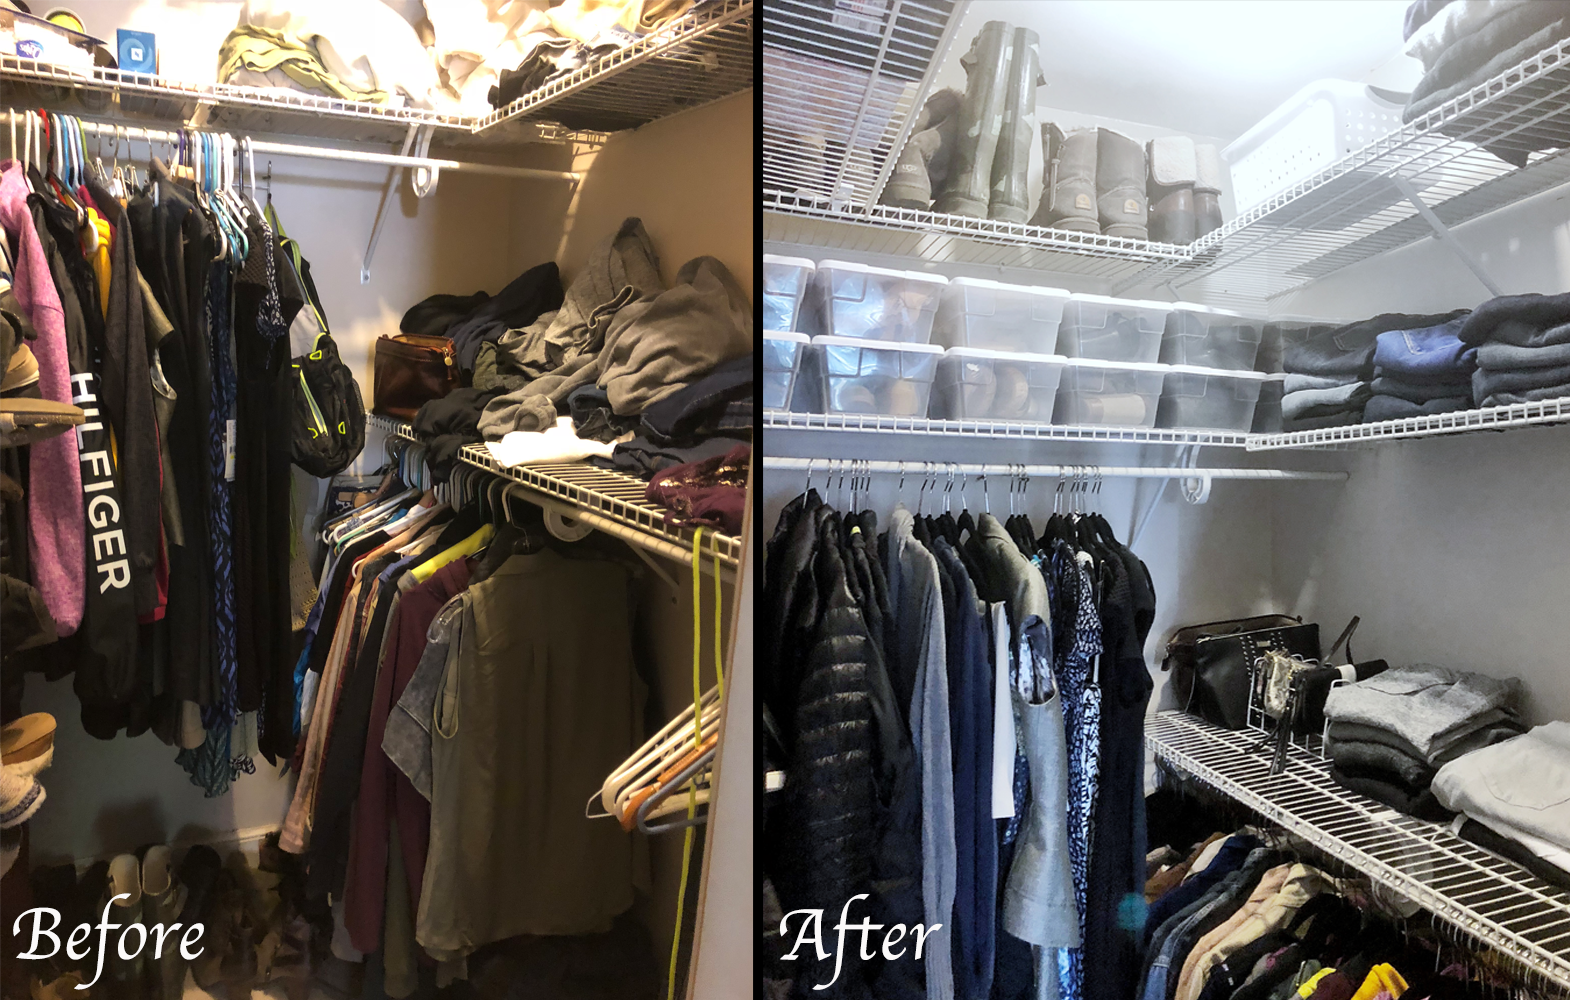
bedroom walk-in closet organization
This closet was in need of some systems! After going through all of the clothing and shoes to decide what would be kept, we purchased velour, matching hangers as well as shoe box bins and separated all of the items by type. We stored boots on the upper shelf, pants and shoe bins on the second shelf, and organized the clothes neatly on hangers on the poles. We added a little bag section with a file organizer for bags on the third shelf and any items that could be folded were added to this shelf as well. Now this space has a shopping in my own closet sort of feel which is always fun!
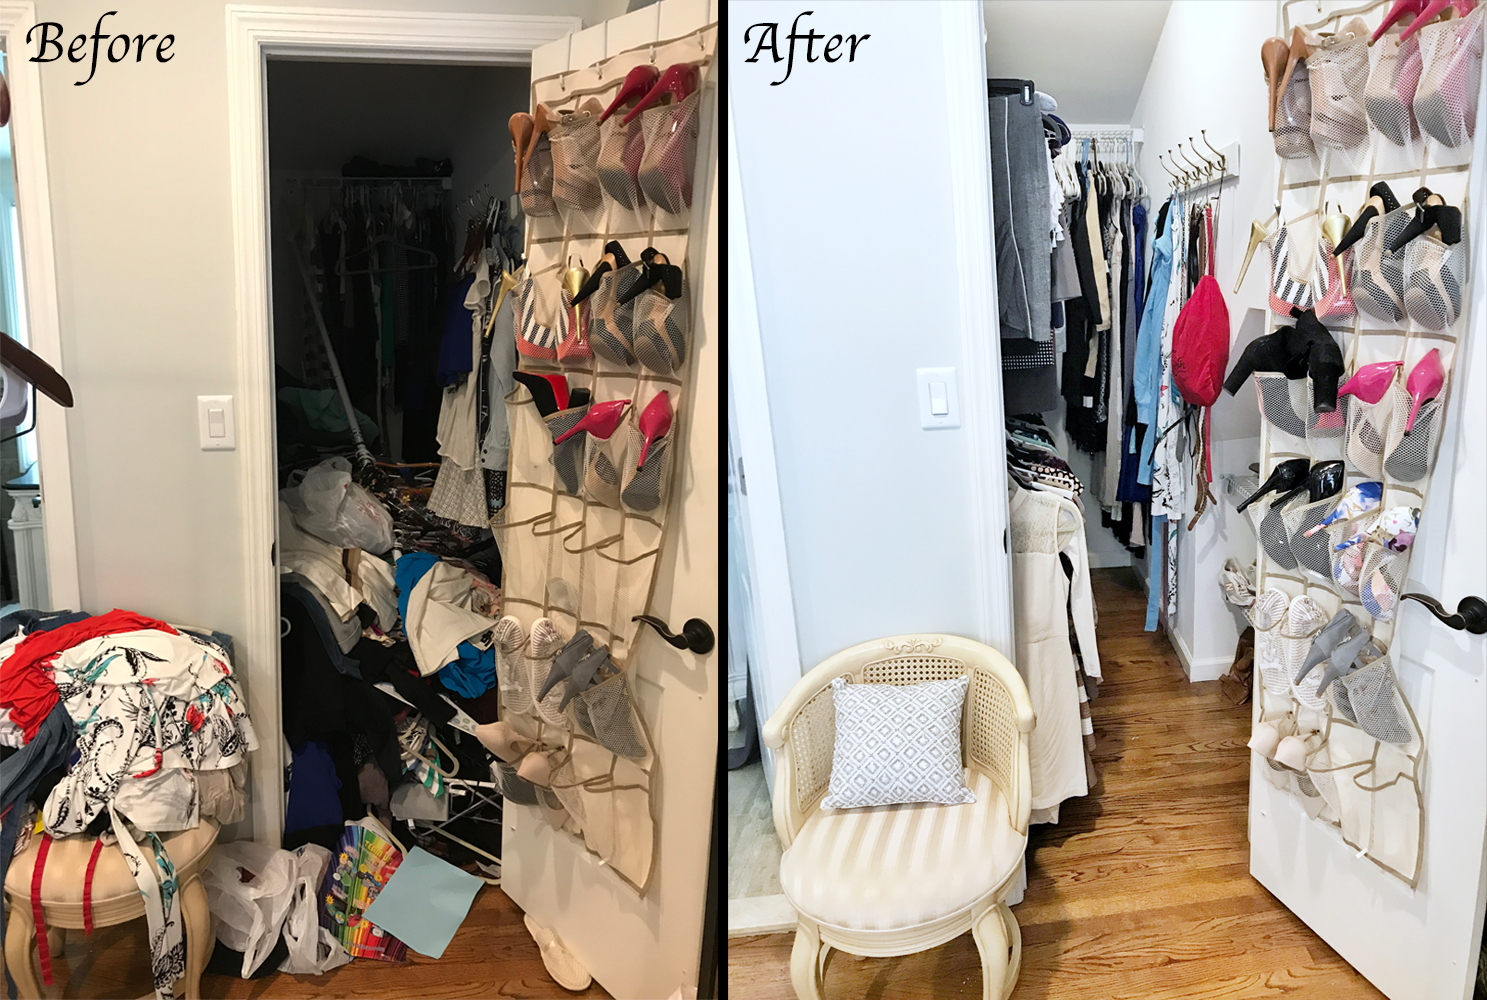
Bedroom Walk-In Closet Organization
This closet had collapsed and become completely inaccessible for our client, and they needed some help! We emptied out the closet of everything, organized the clothing into keep/donate/trash piles, and then went straight into fixing the shelving. Once we fixed the shelving, we organized all of the contents using matching hangers, hooks, and a file organizer for our client’s smaller bags to help them stand upright. We placed any shoes that we found into the over-the-door shoe organizer, and now our client has a functional closet again!

BEDROOM MUSIC CLOSET ORGANIZATION
This closet was cluttered with a variety of items, and this client wanted a closet that would be perfect for storing all of their music necessities! We purged a lot of the clothing and moved them to a separate side of the closet, making sure to only keep a few of the clothing items so as to keep the area spacious. We then installed S-hooks to hang the guitars from, labeled the storage racks for various non-music related items (such as their skiing supplies), implemented bins to store wires and loose music items in, and turned this closet into the perfect music storage room for our lovely client!

BedrOOM VANITY ORGANIZATION
This vanity corner was in need of some serious help! It had become the catch-all for items that our clients weren't sure what to do with, and overtime became a mess that left the area completely unusable. Here, we sorted through all items and decided what to keep. We then took the shoes out of the area and placed them on a shoe rack in a closet, where they belonged. We added a two tier stand to hold vanity products, added a chair to use at the desk, and consolidated products into one drawer system. Now this space is usable again!

Bedroom organization
Before Klutter Free Me, this bedroom needed some serious, deep decluttering. It was far from a relaxing space. Our professional staff took charge of the situation. We started by eliminating all of the clothing that was not being worn, did not fit, or just no longer was needed or wanted. We then set up a coat rack for our clients' extra bags and hats and cleared out the unwanted items, which created a serene environment where our client is now able to relax, read and sleep peacefully. Our Professional staff can help you, too!
CHILDREN’S BEDROOMS

CHILDREN'S BEDROOM ORGANIZATION
This bedroom was absolutely FILLED with clutter- toys galore! This can happen in the blink of an eye if there aren't any systems in place to store toys and keep them under control. We initially sorted through all of the toys and separated them into donation, trash, and keep piles. Once we did that, we implemented a completely new system in the closet- we made use of a previously owned shelf to store labeled bins with toys in them, created a neat little lego corner with drawers filled with legos, moved around some furniture to make better use of storage and space, neatly stored all of the board games on the upper shelf, and made this boy's bedroom an organized dream! We're so happy that he can play peacefully! Staying Klutter Free pays off!

CHILDREN'S BEDROOM ORGANIZATION
This is another shot from a bedroom that we worked on! This corner in particular was very cluttered and inaccessible. We wanted to create a neat little space for our client's son's accessories, such as hats and shoes. We re-homed the toys that were currently there, implemented a shoe rack, installed a neat rack to hang his hats on, and left this area free from clutter!
CHILDREN’S BEDROOM ORGANIZATION
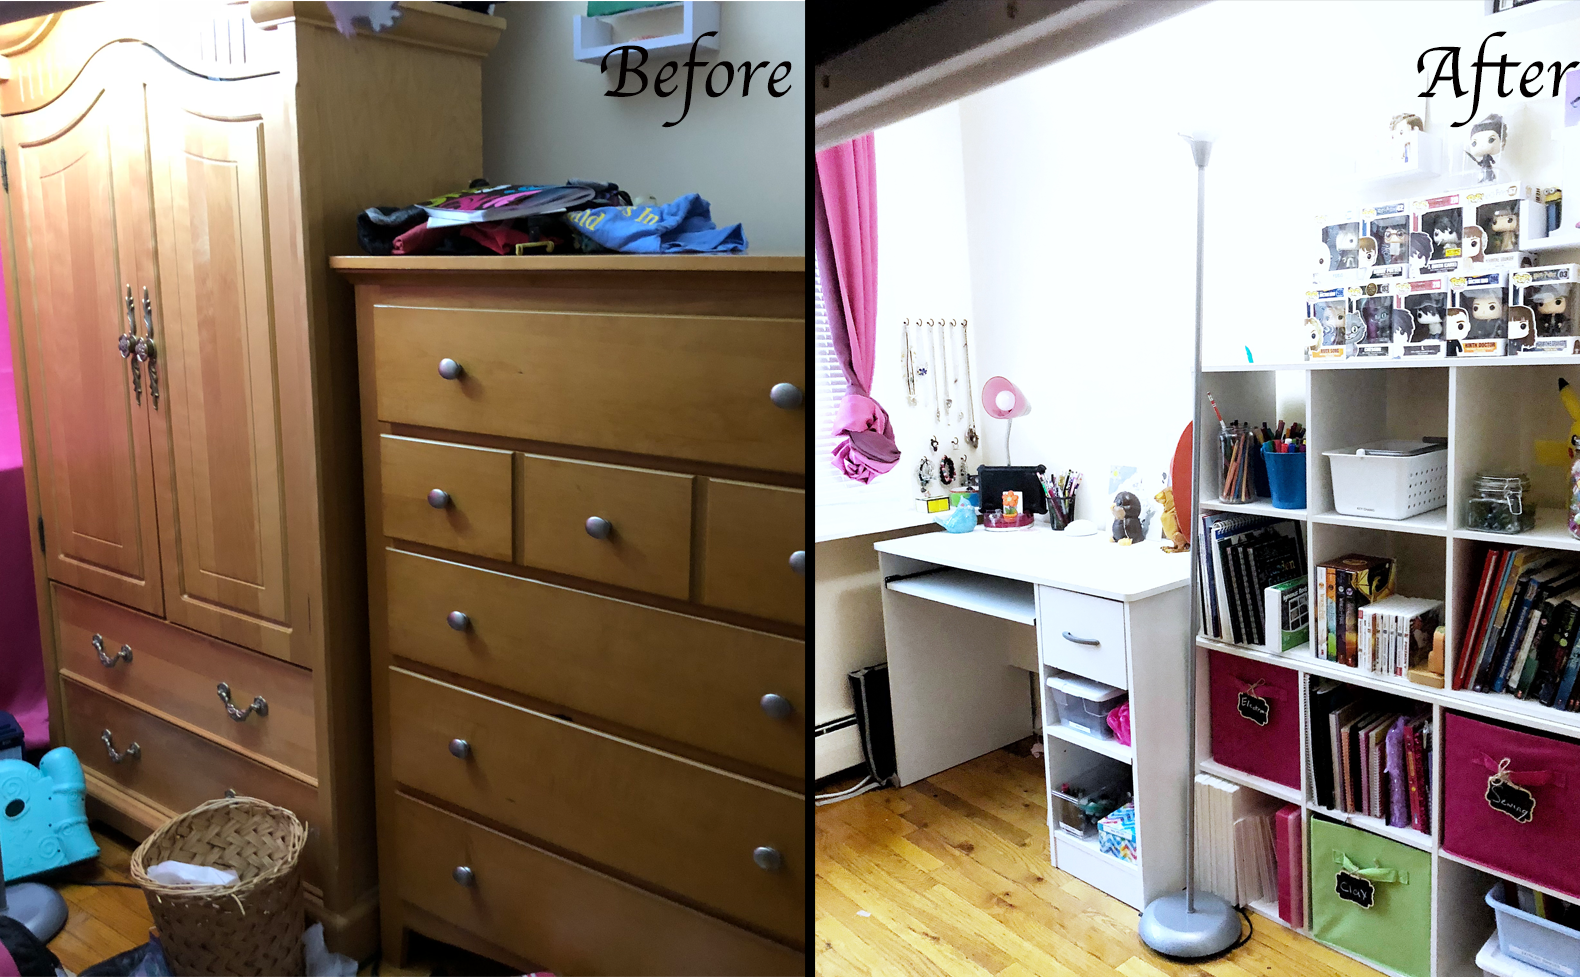
This section of this child’s bedroom wasn’t making the best of the space! We decided to relocate the previous furniture and turn this into a cozy little corner where the child could easily read, do homework, and create art. We implemented organized, color coordinated, and labeled bins, neatly displayed the child’s funko pop figures, added clear bins for the storage of desk items in the desk spaces, and added a neat little hook system for the child’s jewelry. We feel that this made much better use of the space and really gave this young girl a cool spot to relax and have all of her favorite things easily accessible!

CHILDREN'S BEDROOM DESK ORGANIZATION
This little girl had a very cluttered desk area that she wanted to look neat! We re-did her entire room, and this one area was one of her favorites. We implemented bins into her desk drawer to keep her like-items neat and organized, de-cluttered the entire area, and left it looking inviting- now she can draw and do her homework on her desk and access anything she needs quickly and easily!


Children’s corner organization (ABOVE 2 PHOTOS)
This corner was being used by a little girl for a variety of things- art, homework, and vanity items like makeup and hairbrushes. However, it was a bit of a mess! The little girl couldn’t locate things easily and felt stressed in this space. We overtook the space and had so much fun in the process! We did a HUGE declutter of any items that were old, broken, or otherwise unused. Then, we categorized everything by type, followed by deciding what would go where and how we should organize the space. We then created a desk dedicated to hair and beauty products, a shelf for funko pop figures and face painting bins, and redecorated her in-wall cabinet containing all of her arts and crafts supplies! With the use of bins, a new shelf, some art drawers, and hooks, we were able to leave this little girl’s corner looking organized and fun!

children’s corner organization
This children’s corner needed some serious intervention! There were no “homes” for anything in this space, and everything was all over the place. After purging and decluttering, we brainstormed about what to do with the space- our client decided to purchase a large desk for the area since it was so spacious in order to turn this into an awesome homework/arts and crafts area for the kids. After installing everything, we added little cup organizers to store writing utensils, stored things away neatly into the drawers, and gave each child a little board by their chairs. Now this corner is the perfect space for studying, doing homework, and creating art without the distraction of clutter!
BASEMENTS

BASEMENT APARTMENT organization
This basement apartment was overrun by toys, and was being used as an extra storage space. Our goal for this space was to turn it into a functional apartment. We created a toy room in another room in the home and transferred the toys. After purging and re-homing the toys, we focused on the books and furniture positioning. We relocated the book shelves and used what our client already had in her home to re-design the shelves. Not only do we organize, but we can completely recreate and redesign your space so you can live a happy, organized, Klutter Free life!
BASEMENT ORGANIZATION
This client had recently moved and had boxes in her basement that were a mess! We needed to tackle this area, and badly. We initially purged lot of items. We then categorized everything, put together shelving, and worked on creating a nice decor and serving section. We displayed everything neatly for easy access, labeled everything, and left this basement looking brand new for our lovely client!

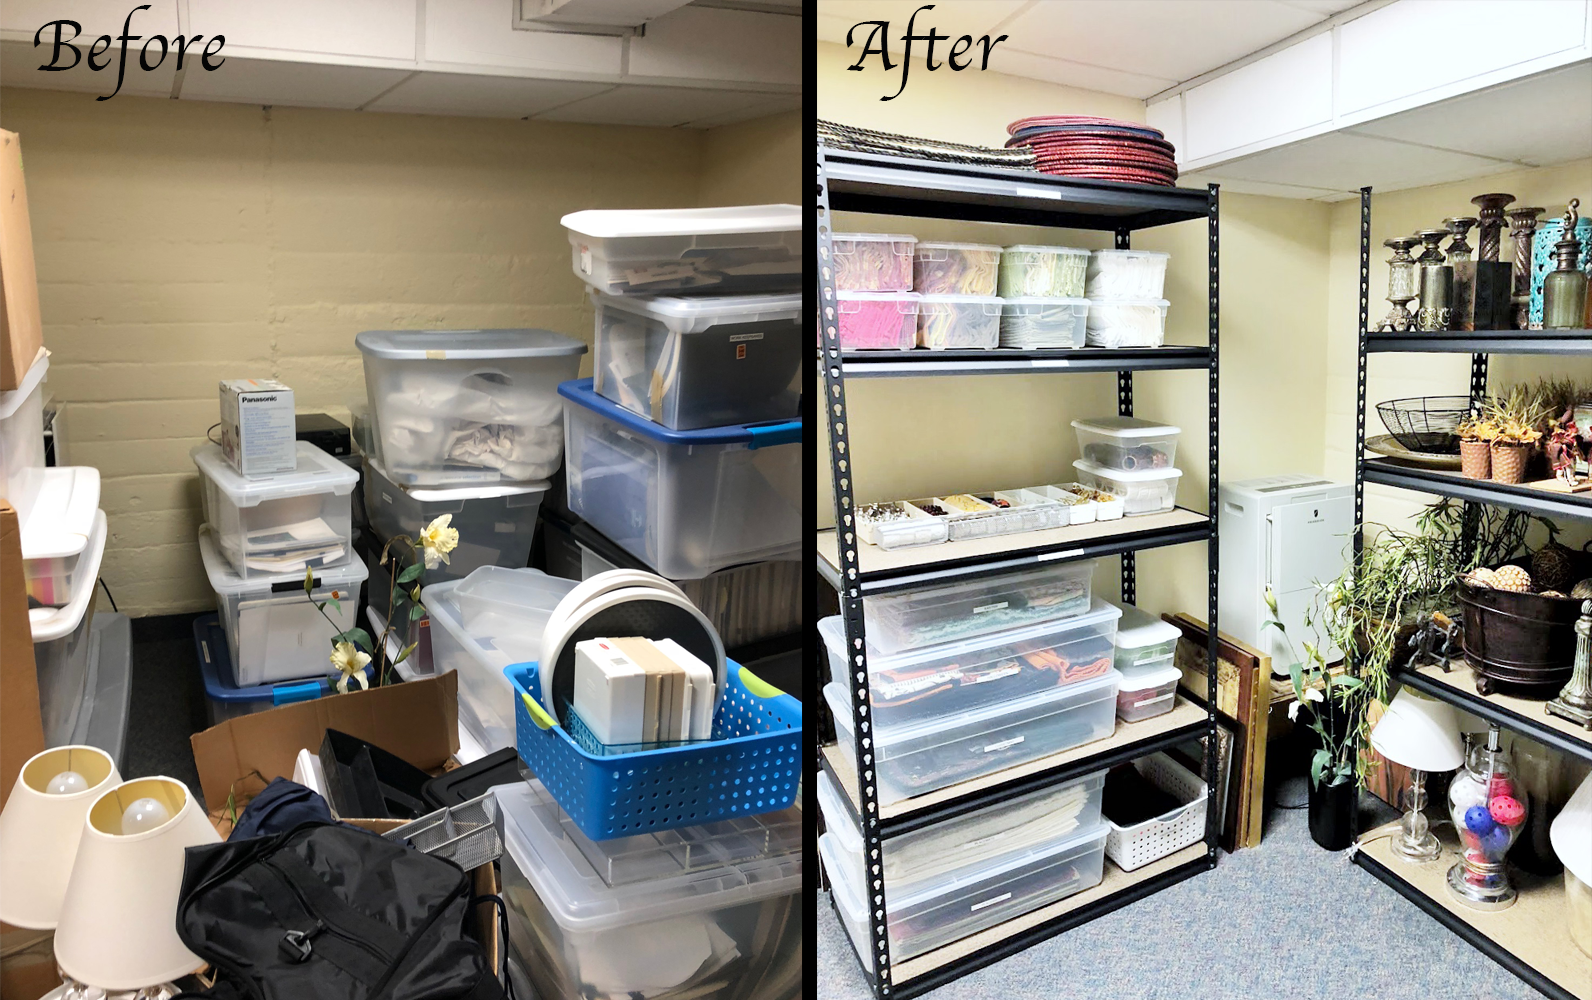
BASEMENT ORGANIZATION
This basement was so cluttered that you could barely walk in it! Our clients were sick of the area and really wanted a complete makeover. We purged an insane amount of garbage from this basement- items that our client hadn't seen in ages and definitely didn't need anymore. Then, we installed racks to store any items the clients wanted to keep, such as photos, memories, and an extensive tape collection. We labeled the bins, set them up on the shelves, and left some spare bins for items that our clients needed to store in the basement! The end result was a massive difference and we love how it turned out. Easy to maintain, too!
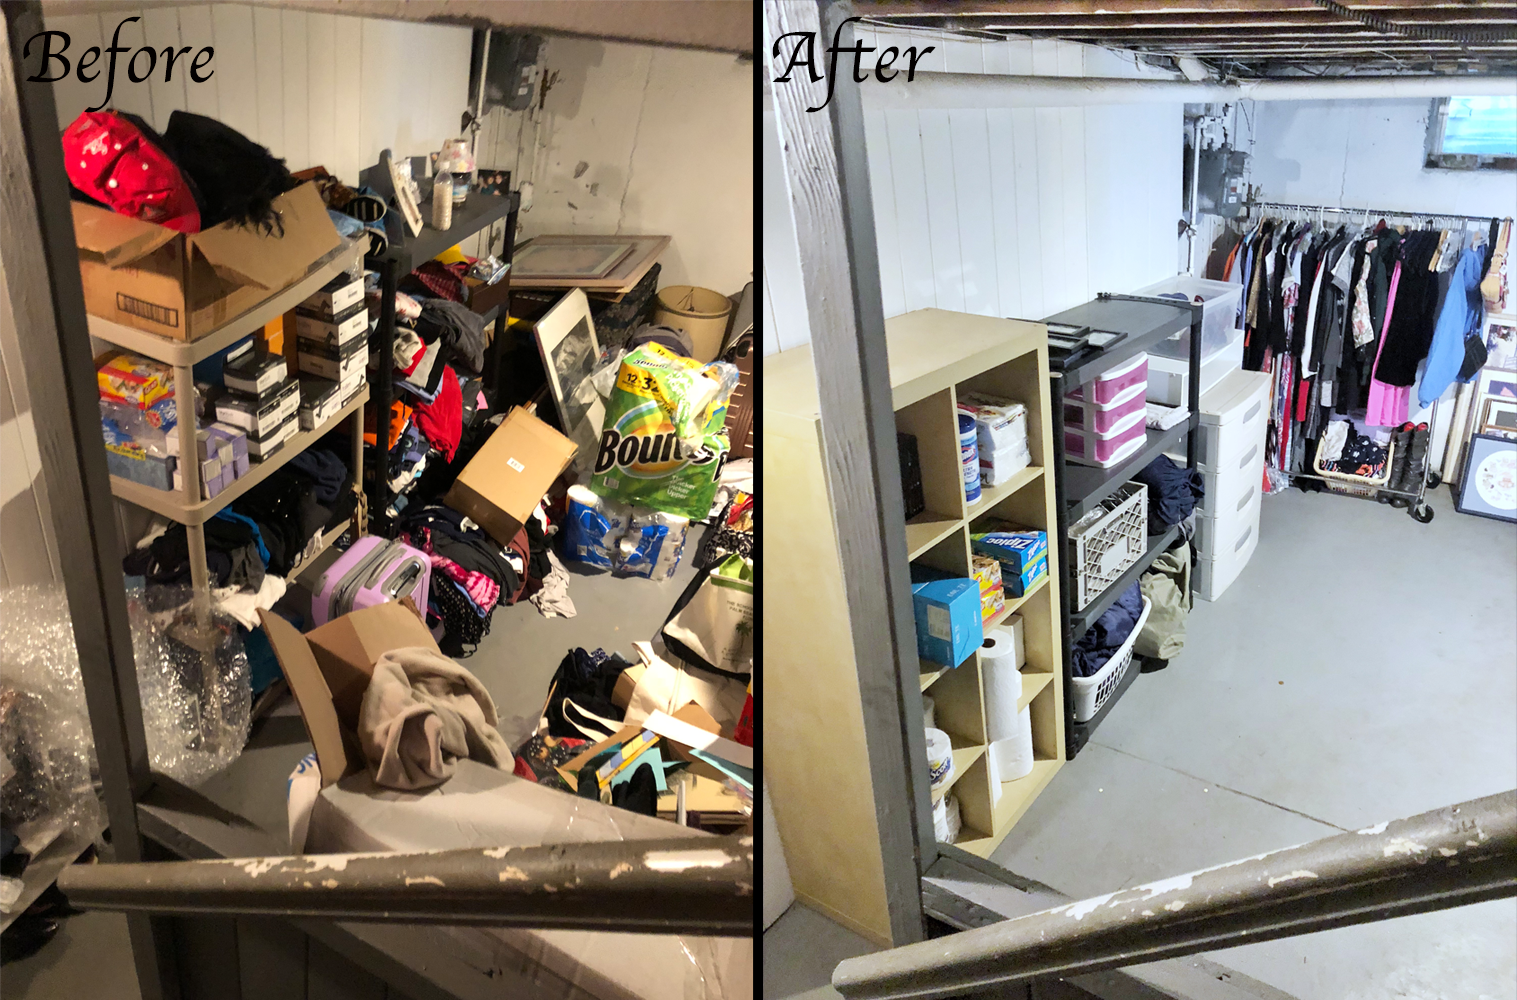
BASEMENT ORGANIZATION
HUGE decluttering session with this client in the basement! Here, we purged items, got rid of old clothing, created an extra section for paper goods, created holiday/photo/laundry sections separately, labeled everything as needed, and took all of our client’s donations off of their hands. Now this basement is spacious, usable, and Klutter Free again!
BATHROOMS

bathroom drawer organization
Here, items were thrown into this drawer (mostly health related items like pills and medications) and it was a hassle to locate anything. We decided our client would have an easier time if items were separated- as long as they were ONLY items the client always used. We got to purging the items that were old or expired, and then purchased a clear drawer organizer to store certain medications and creams. We placed the remaining pills neatly along the sides and left this drawer looking Klutter Free, complete with labels stating what’s in the drawer!

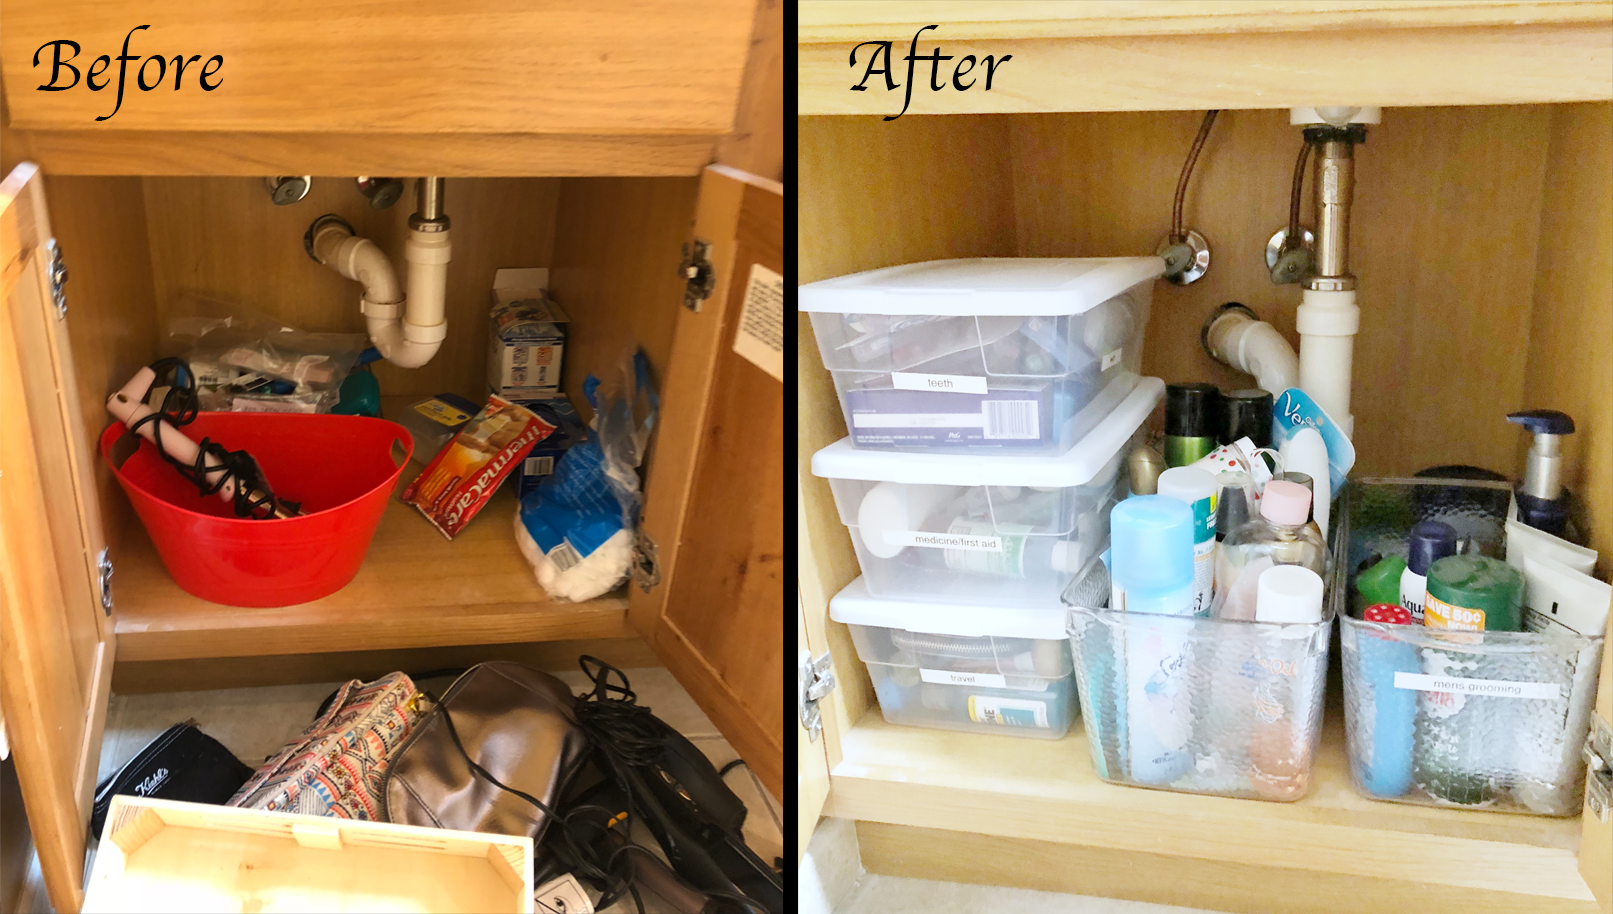
BATHROOM UNDER-THE-SINK ORGANIZATION
This under the sink area in our client's bathroom was pretty cluttered! It was hard to find things, items were mixed up, and while there were a couple of bins in place, they weren't being used to the best of their abilities. We purged all the items, sorted everything by category, and came up with solutions as to what sort of containers these items should go in. Once we found solutions, we implemented various shapes and sizes of bins to best fit each categories' needs! After labeling them appropriately, we were left with a very aesthetically pleasing, organized under the sink area with tons of items that all have homes!
BATHROOM UNDER-THE-SINK ORGANIZATION
Under the sink organization can be tough- those doors on the closet make it reaaaal easy for items to end up thrown in there when we're in a rush, slamming the doors shut and forgetting about it! This cabinet was an example of that- the items on the floor were all stuffed in the cabinet as well. We purged through the items to decide what would be kept, and then created little systems- we stored less frequently used items into closed, clear bins with labels, and stored more frequently used items into open-top bins for an easy grab-and-go feel. Now everything has a home!

BATHROOM CABINET ORGANIZATION
We LOVE making bathroom cabinets look sleek and neat! Here, items were stashed away in an unorganized fashion in a cabinet. We initially purged all of the items in every cabinet our client had in order to decide which items would go into which cabinets. Once we decided that this cabinet would be used for face, hair, and nasal products, our client decided that they loved the look of clear bins- so we purchased some clear bins (with handles!) and started storing items into them. We labeled the bins for easy identification, and this was the end result!

BATHROOM CLOSET ORGANIZATION
This bathroom closet was filled to the brim with various bathroom products and towels. Our goal for this space was to turn it into a closet where our client could easily locate all of her bathroom items, and have quick access to towels. We purged all expired items as well as items that our client did not use anymore. We then placed her items into designated bins with labels for easy identification, and folded her towels nicely into sections. Now her closet is functional and no longer cluttered- everything has a home, and everything is easy to locate!
PLAYROOMS

PLAYROOM ORGANIZATION
This playroom section was in need of some solutions! The shelving was perfect for storing any and all toys the client’s child had, but the systems in place weren’t helping. After decluttering excess toys and pulling everything off of the shelves, we categorized all like-items, figured out where to store specific toys, and created maintainable systems via labeled bins. We put smaller toys in clear bins, larger toys down low, and left this playroom section ready for playtime!

PLAYROOM ORGANIZATION
This playroom needed some better storage systems and a big declutter for our client! After decluttering and categorizing all of the items, we implemented new shelving, bins, and baskets to create an organized, easy to navigate playroom! We love how it turned out- everything is bright, friendly, and all of the toys have a “home”, with color coordinated books for an extra pop of visual appeal!

PLAYROOM ORGANIZATION
This playroom was a BIG project that we had so much fun working on! This room involved a LOT of toy purging- we created a very large donation pile and threw away any broken or old toys that were no longer usable. Once we were left with toys our client wanted to keep, we got to organizing, taking it one step at a time. The bookshelf was left solely for books and various "artsy" items. We added bins with specific toys in them, lining them up to allow for more play space on the floor. We utilized the space as efficiently as possible and the room ended up looking completely different- we were so pleased that we could help create this space for our client!

Playroom organization
This room was being used as an office, arts and crafts room, dressing room, toy room, and storage room- all in one. It was very overwhelming for this 2nd time expecting family. However, with a little hard work, anything is possible! We first created a separate main office for the adults, which allowed us to remove all the office supplies from this room. We then created a storage area in the basement for toys that would be rotated every few months. We did a big purge of toys and supplies, donating them to needy families. We relocated the toy storage units against the walls to make a play space in the middle of the room. We created a play kitchen area, and organized the toys onto the shelving and toy units. In the end, we had a nice neat and organized playroom- and a happy family! This is what being Klutter Free looks like!
GARAGES


GARAGE ORGANIZATION (above 2 photos)
Organized garage, anyone?! Previously, our client was overwhelmed by the garage and how she had a very hard time digging through boxes to locate anything, on top of various other issues. We took full advantage of how large this garage was and really went to town! Here, we hung up all of our client's tools with a hook system against the wall to keep them off the ground/looking neat and tidy. We also purged all of the items from the bins and got rid of what wasn't needed or wanted, followed by placing the remaining, categorized items into matching bins with clear, easy to read labels. We stored the larger items on the floor underneath the shelves, moved some shelves around, and the end result left our client feeling MUCH better!

GARAGE ORGANIZATION
HUGE garage overhaul! This garage was in need of some serious TLC. We purged, donated, and trashed a large amount of items, and then went in to organize everything- we separated items into bins, hung up the bicycles, and left this garage roomy and in tip-top shape!

garage organization
Before, this garage was littered with children's toys and cleaning products that were not accessible. After our decluttering process, we added some shelving units, sorted toys into bins, and labeled them for easy access. We created a specific section for cleaning, and used s-hooks to hang mops and brooms.
KITCHENS

KITCHEN PANTRY ORGANIZATION
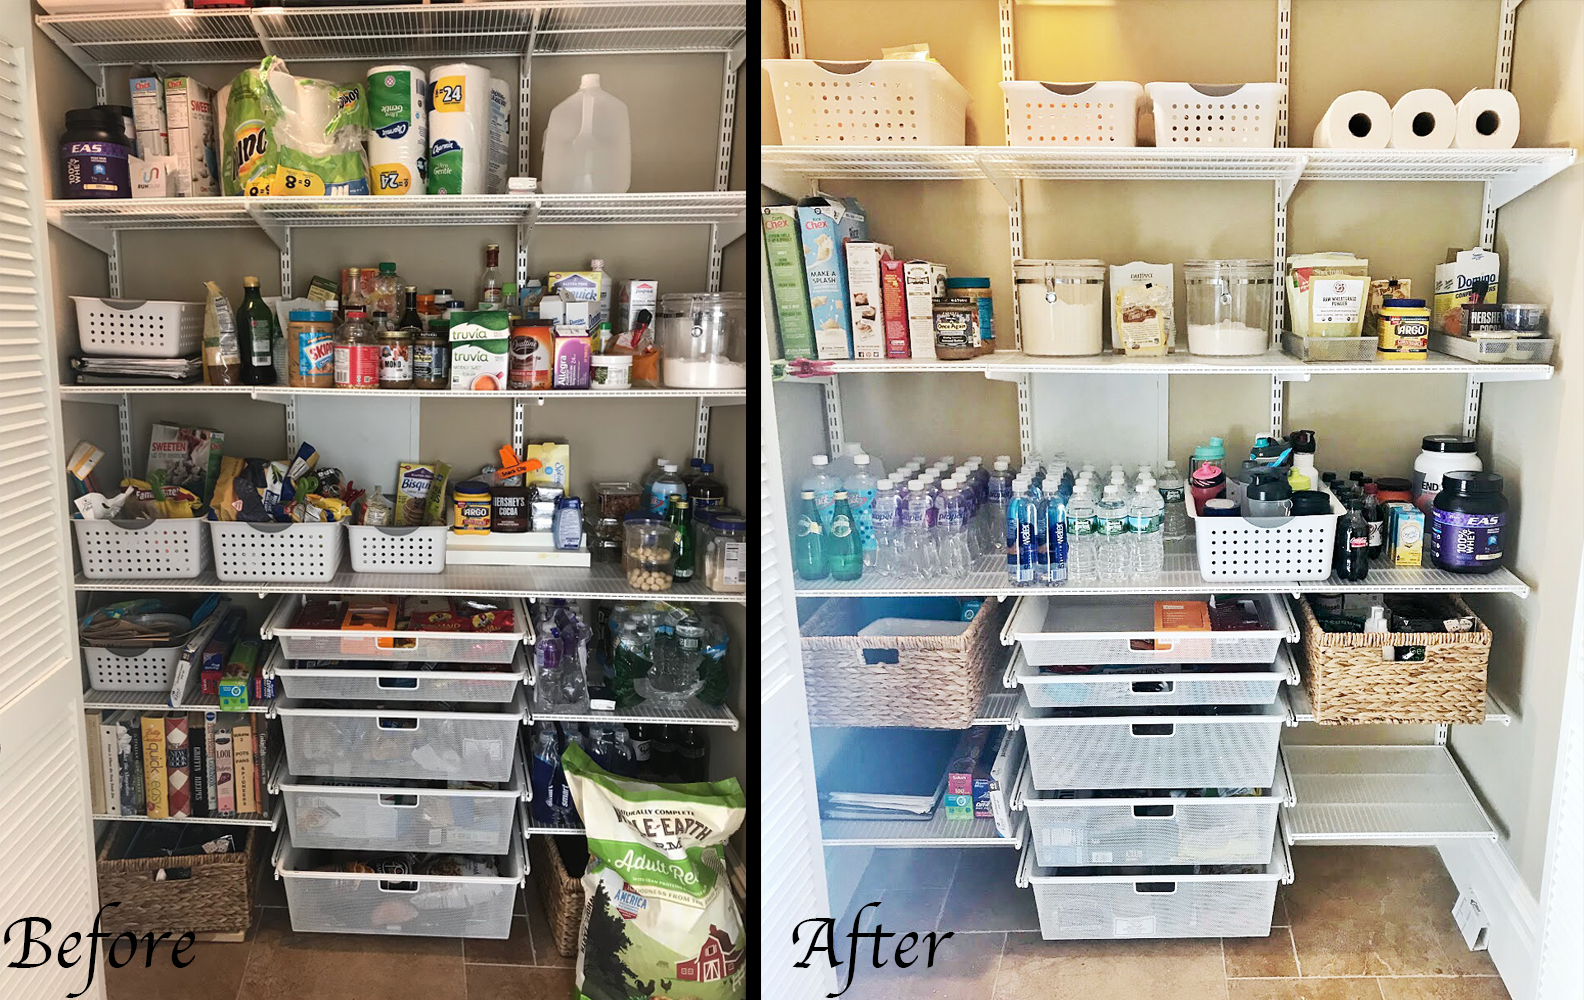
Our client had a brand new pantry that she was dying to fill up, as all of her food and items were still in boxes. She needed help with the process, so we came along and began the organizing. We unpacked a variety of food items from around the kitchen- all items that she wanted to store in the pantry. We threw out expired food, then went on a hunt to find the appropriate storage items- our client loved the look of jars and wired bins, and wanted to keep the area looking minimalistic and clean. We collected the storage items, got some Lazy Susans (seen on the left of the after photo), and stored away like-items together! We kept heavier appliances on the bottom shelves and off of the counters since they weren't used frequently. Our client was in love with the end result!
KITCHEN PANTRY ORGANIZATION
This pantry was cluttered! It contained bins, which was great, but everything had fallen out of place and items were mixed up everywhere. It was hard for our client to locate what she needed, when she needed it. We purged all expired items, categorized all like-items, and came up with systems that would work better for our client- we placed the water bottles within arms reach for a quick and easy grab, placed all empty drinking bottles into a bin for easier locating, contained all distinct food items into separate areas/bins, and generally gave each and every item a home! This pantry was large and filled with potential- so we took care of it!

kitchen pantry organization
This pantry needed some help getting in order! After purging away expired products, we dedicated certain shelves to certain items. We also made use of our client’s existing airtight, clear containers to store loose food such as cereal and flour. Similarly, we created snack bins and neatly arranged them on the upper shelves for easy grabbing!

KITCHEN CABINET ORGANIZATION
This kitchen cabinet needed some help! It was cluttered with medicines, papers, documents, and more. We went in, discarded any expired medicines, implemented bins to hold manuals, drink items, and medicines, and left this cabinet fully functional for our lovely client!

KITCHEN CABINET ORGANIZATION
This kitchen cabinet was a catch-all for all sorts of food items, and lacked structure/functionality. We went in, threw out expired items, and put similar items into matching bins! We also put the cereal into airtight containers- this keeps the food fresher for longer, keeps out bugs, and looks aesthetically pleasing. This cabinet is now fully functional and easy to maintain!

KITCHEN CABINET ORGANIZATION
While this kitchen cabinet seemed to have like-items together, it was still very crowded- if one item was pulled out, another item was likely to fall and break as well. Not ideal. Our client really wanted these cabinets to be more spacious and have her items easily accessible. We purged a lot of the items and proceeded to re-home a lot of the plates and glasses into separate cabinets that we had emptied out previously. We turned these two cabinets into an area where our client could easily access medicine, serving bowls, and mixing bowls- all items she uses frequently while making food! We stored away some cooking items in a bin at the top of the left shelf in order to keep them safe and together, and made sure that any items on the top shelves were items our client didn't use as often. These two cabinets were definitely more useful for our clients larger items!

KITCHEN COUNTER ORGANIZATION
This kitchen was a big mess- it was virtually unusable by our client. Our goal here was to make this kitchen useful again! We cleared off all of the counters, which involved throwing away expired items and sorting useful items into initial categories so we could determine where they would go. We then created a coffee station for our client in the corner of the counter, moved the microwave to a different area to create more counter space, stored away all of the food items into the cabinets (and into bins, seen under the microwave) in an organized manner, and left this kitchen neat and usable for our lovely client!

KITCHEN counter + cabinet ORGANIZATION
This kitchen was previously a crowded, cluttered mess, which happens to a lot of people and is totally understandable! Our main goal here was to clear out and organize all of the cabinets, create clean and clutter free counters, and give designated homes to all of the cabinet items. We purged expired items, decluttered anything old and unwanted, cleared off the counters aside from some decor and necessary, frequently used items, went through all of the cabinets and put specific items into specific cabinets that were better sized for the specific items in question, and the end result was a clean and lovely kitchen! The cabinets ended up clutter free, with categorized sections for all of our client's items.
OFFICES

OFFICE SHELF ORGANIZATION
This office shelf was filled with various, irrelevant items that didn't belong, as well as items that our client did often use in her office. The client really wanted this shelf to be more minimalistic and contain items she could easily reach for while working at her desk. We got rid of all of the items that belonged in separate areas of the home and re-homed them. Then, we implemented a small drawer where she could keep her checks and assorted papers, left the previous bin there to hold her small waters, re-homed the books that didn't belong there, and created a shelf that was minimalistic and contained only useful items!

OFFICE Command center organization
This command center had gotten out of control very quickly. We worked with our client to clear everything out of this area. We purged old, expired medication, as well as lotions and papers. We sorted through papers, teaching our client how to decide what papers could be thrown out and when they could be discarded of. Then, we simplified this area and gave every item a home to go back to, as well as a label for clear and easy cleanup! This area went from chaos to calm.
office organization
'Tis the season for paper clutter! This client was drowning in paper. Working in her office was a chore. We organized all of the paper, throwing out any paper that wasn't necessary to keep. We cleaned all of the shelves and drawers, and created a system with which our client could easily keep up with.

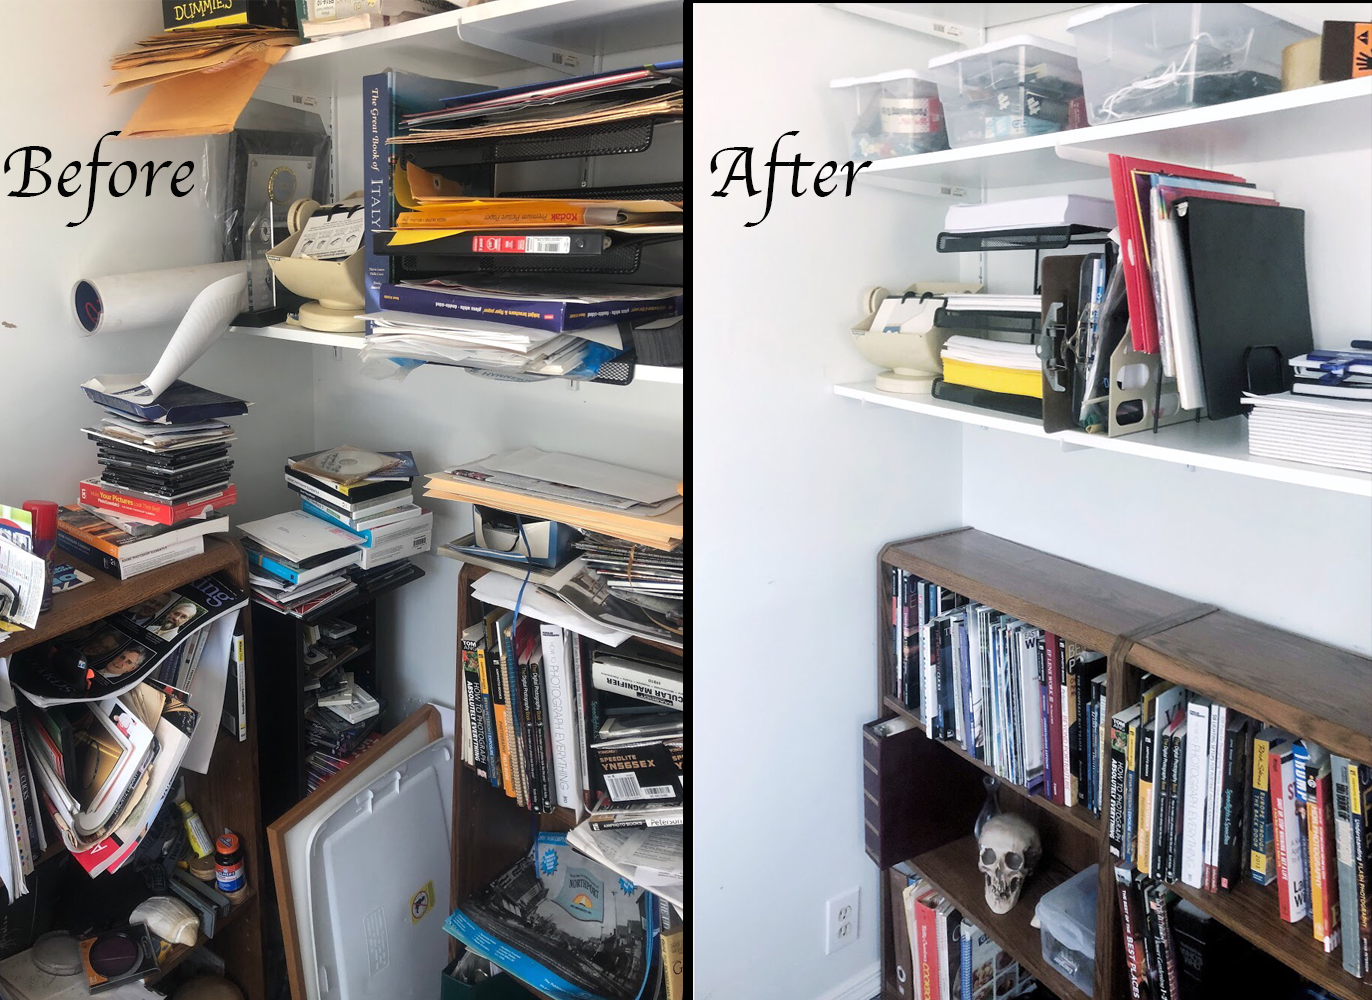
OFFICE BOOKSHELF ORGANIZATION
This bookshelf needed a little touching up- it was beginning to get cluttered with various, irrelevant items and needed some structure! We moved the books that our client wanted to keep to the top shelf, keeping all of the books in one spot. We then implemented matching, small bins to store cards, documents, wires, etc- all items that our client wanted to keep accessible on this office shelf. We stored all writing instruments in a cup that our client had handy, and left this shelf looking neat and functional!

OFFICE PAPER/BOOKS ORGANIZATION (ABOVE 2 photos)
Papers can get out of hand so, so quickly if they aren't kept on top of- our client needed help getting their papers and books in order! We initially attacked the papers- we sorted through all of them, shredded what was no longer needed, and kept only the essential documents, which we then stored away into folders in multiple file organizers. We created bins for various miscellaneous items, such as wires and office supplies, and stacked the books neatly- we also left some decor visible to create a nice, visually appealing area! We moved some of the shelves to different areas as they were no longer needed once we finished purging and organizing this space, which then revealed a now-accessible outlet and left more space in this room!

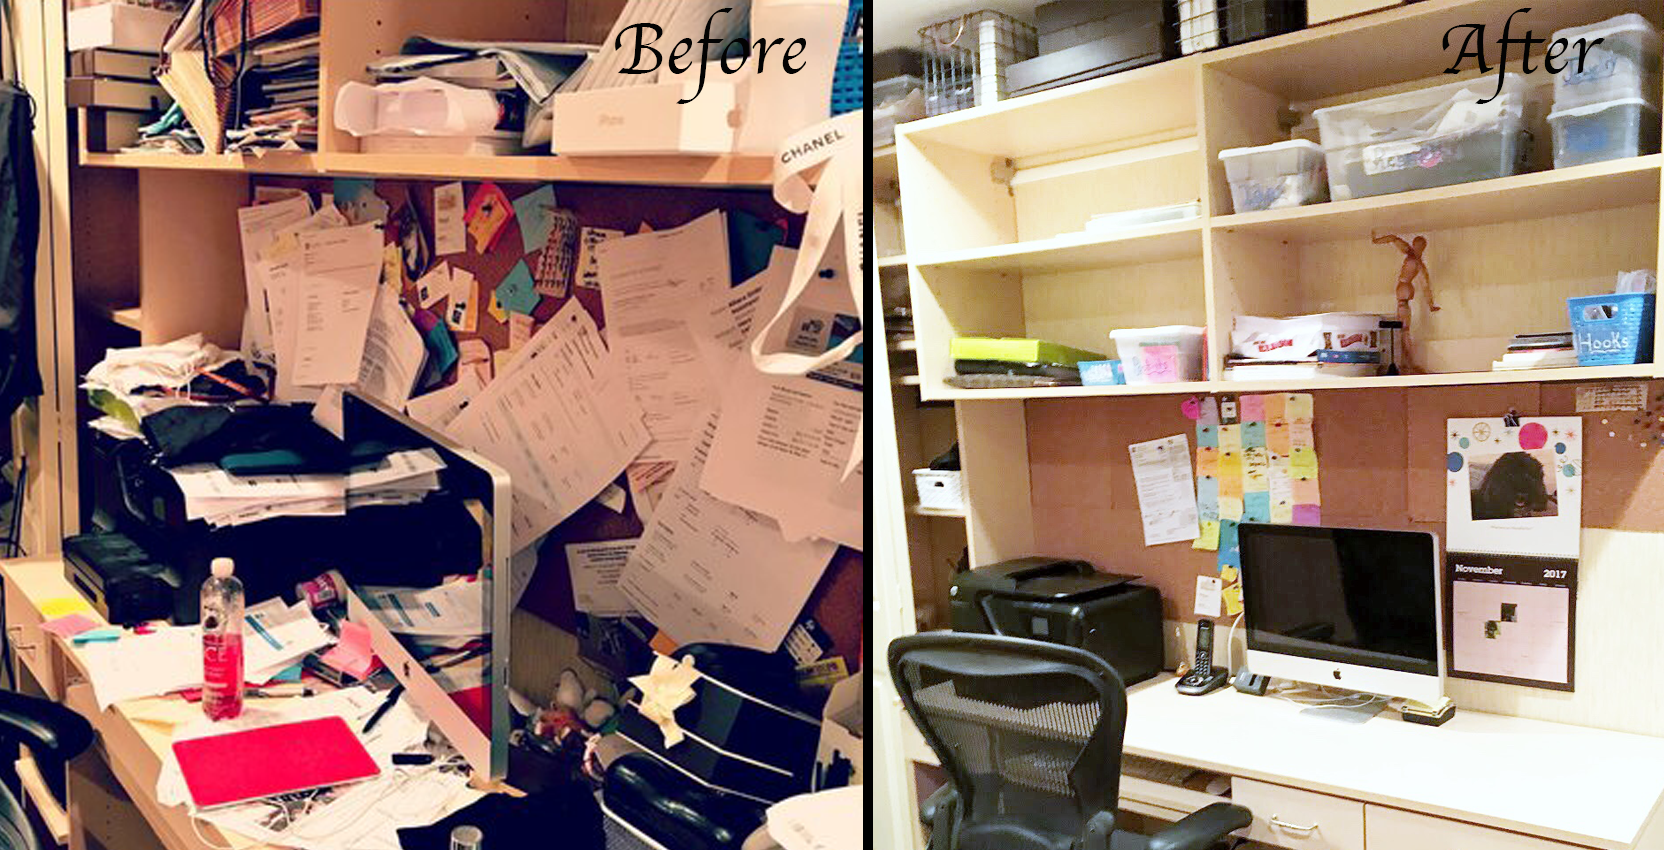
Office organization
Here is a before and after photo of a home office. Before we organized it, the area was a catchall for projects and papers that needed to shredded and or filed. We sorted through everything and discarded of the trash and unnecessary items. We then shredded papers and set up an easy to maintain filing system and a functional desk area, so work could be done efficiently from the home office.
MISCELLANEOUS ROOMS

Entryway organization
This entryway was struggling. Bags and mail were getting dumped on the small bench and all over the floor surrounding the area. We switched the bench to cube storage and added a stand up tree hook. The cube allowed us to use the bottom for shoe storage and the upper cubes for mail sorting, packages, gloves, hats- etc. The tree hook was able to hold the coats and purses, eliminating them from ending up on the floor. Now this entryway is truly Klutter Free!

Spare room SHELF ORGANIZATION
This client had a shelf in a spare room filled with miscellaneous items that lacked any sort of structure. She really wanted this area to be neat and put together, especially since the shelf was so large and full of potential! We purged items, separated items, and stored items away into appropriate bins with labels to create this aesthetically pleasing shelf!